الكود البرمجي
قبل رفع الكود البرمجي للوحة الاردوينو عليك قراءة شرح الكود البرمجي.
#include<SoftwareSerial.h>

SoftwareSerial client(2,3); //RX, TX

String webpage="";

int i=0,k=0;

String readString;
int x=0;
boolean No_IP=false;
String IP="";

char temp1='0';
String name="<p>Geeks valley</p>";   //22
String dat="<p>Data Received Successfully.....</p>";     //21


void check4IP(int t1)
{
int t2=millis();
while(t2+t1>millis())
 {
while(client.available()>0)
{
if(client.find("WIFI GOT IP"))
{
No_IP=true;
}
}

}
}

void get_ip()
{
 IP="";
char ch=0;
while(1)
{
client.println("AT+CIFSR");
while(client.available()>0)
{
if(client.find("STAIP,"))
{
delay(1000);
Serial.print("IP Address:");
while(client.available()>0)
 {
ch=client.read();
  if(ch=='+')
break;
 IP+=ch;
}
}
 if(ch=='+')
break;
 }
 if(ch=='+')
break;
delay(1000);
}
Serial.print(IP);
Serial.print("Port:");
Serial.println(80);
}

void connect_wifi(String cmd, int t)
{
 int temp=0,i=0;
 while(1)
{
Serial.println(cmd);
client.println(cmd);
while(client.available())
 {
if(client.find("OK"))
i=8;
}
delay(t);
  if(i>5)
break;
i++;
}
if(i==8)
Serial.println("OK");
else
Serial.println("Error");
}
void wifi_init()
{
connect_wifi("AT",100);
connect_wifi("AT+CWMODE=3",100);
connect_wifi("AT+CWQAP",100);
connect_wifi("AT+RST",5000);
check4IP(5000);
 if(!No_IP)
 {
Serial.println("Connecting Wifi....");
 connect_wifi("AT+CWJAP=\"Network name\",\"Network password\"",7000);         //provide your WiFi username and password here
// connect_wifi("AT+CWJAP=\"vpn address\",\"wireless network\"",7000);
}
else
{
 }
Serial.println("Wifi Connected");
get_ip();
connect_wifi("AT+CIPMUX=1",100);
connect_wifi("AT+CIPSERVER=1,80",100);
}
void sendwebdata(String webPage)
{
 int ii=0;
while(1)
{
unsigned int l=webPage.length();
Serial.print("AT+CIPSEND=0,");
client.print("AT+CIPSEND=0,");
Serial.println(l+2);
client.println(l+2);
delay(100);
Serial.println(webPage);
client.println(webPage);
while(client.available())
{
 //Serial.print(Serial.read());
 if(client.find("OK"))
 {
ii=11;
break;
}
 }
 if(ii==11)
break;
delay(100);
  }
}
void setup()
{
Serial.begin(115200);
client.begin(115200);
wifi_init();


Serial.println("System Ready..");

}
void loop()

{
k=0;
Serial.println("Please Refresh your Page");
while(k<1000)
 {
 k++;
while(client.available())
{
 if(client.find("0,CONNECT"))
{
Serial.println("Start Printing");
 Send();
 Serial.println("Done Printing");
delay(1000);
}
 }
delay(1);
}

}
void Send()
{
webpage = "<h1>Welcome to Geeks valley</h1><body bgcolor=f0f0f0>";
sendwebdata(webpage);
webpage=name;
webpage+=dat;
sendwebdata(webpage);
delay(1000);
webpage = "<a href=\"https://geeksvalley.com/tutorials/";
webpage+="\">Click Here for tutorials</a>";
sendwebdata(webpage);
client.println("AT+CIPCLOSE=0");

}
شرح الكود البرمجي
نعرف المكتبات المستخدمة في المشروع وهي مكتبة الاتصال التسلسلي.
#include<SoftwareSerial.h>
هذا السطر يوضح المنافذ المستخدمة لربط Rx وTx.
SoftwareSerial client(2,3); //RX, TX
المتغير IP يحمل عنوان الشبكة للوحة Wi-Fi.
String IP="";
المتغير name يحمل جملة Geeks valley بتنسيق لغة HTML.
والمتغير date يحمل الجملة Data Received Successfully…..
String name="<p>Geeks valley</p>";   //22
String dat="<p>Data Received Successfully.....</p>";     //21
في الدالة check4IP سيتم البحث عن عنوان الشبكة.
void check4IP(int t1)
{
int t2=millis();
while(t2+t1>millis())
 {
while(client.available()>0)
{
if(client.find("WIFI GOT IP"))
{
No_IP=true;
}
}

}
}
في الدالة get_ip سيتم طباعة عنوان الشبكة IP address.
void get_ip()
{
 IP="";
char ch=0;
while(1)
{
client.println("AT+CIFSR");
while(client.available()>0)
{
if(client.find("STAIP,"))
{
delay(1000);
Serial.print("IP Address:");
while(client.available()>0)
 {
ch=client.read();
  if(ch=='+')
break;
 IP+=ch;
}
}
 if(ch=='+')
break;
 }
 if(ch=='+')
break;
delay(1000);
}
Serial.print(IP);
Serial.print("Port:");
Serial.println(80);
}
في الدالة wifi-init سيتم البحث عن الشبكات الموجودة في النطاق، ثم سيتم اختيار الشبكة التي قمت بتعيينها في الكود البرمجي.
void wifi_init()
{
connect_wifi("AT",100);
connect_wifi("AT+CWMODE=3",100);
connect_wifi("AT+CWQAP",100);
connect_wifi("AT+RST",5000);
check4IP(5000);
 if(!No_IP)
 {
Serial.println("Connecting Wifi....");
 connect_wifi("AT+CWJAP=\"Network name\",\"network password\"",7000);         //provide your WiFi username and password here
// connect_wifi("AT+CWJAP=\"vpn address\",\"wireless network\"",7000);
else
{
 }
Serial.println("Wifi Connected");
get_ip();
connect_wifi("AT+CIPMUX=1",100);
connect_wifi("AT+CIPSERVER=1,80",100);
}
عليك تحرير السطر التالي ووضع اسم شبكة الانترنت الخاصة بك ورمزها السري.
connect_wifi("AT+CWJAP=\"Network name\",\"Network password\"",7000); //provide your WiFi username and password here
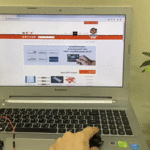
في الدالة setup سيتم تهيئة شاشة الاتصال التسلسلي لطباعة التحديثات الخاصة بوحدة Wi-Fi.
عليك تغيير سرعة نقل البيانات كما في الشكل.
![]()
voidsetup()
{
Serial.begin(115200);
client.begin(115200);
wifi_init();


Serial.println("System Ready..");

}
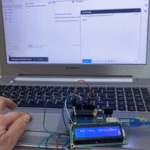
في الدالة send سيتم انشاء خادم ويب.
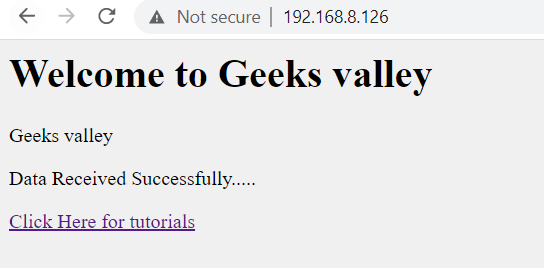
ستظهر الجمل بهذا الشكل:
Welcome to Geeks valley
Geeks valley
Data Received Successfully…..
يمكن تحرير الجمل الموجودة:
void Send()
{
webpage = "<h1>Welcome to Geeks valley</h1><body bgcolor=f0f0f0>";
sendwebdata(webpage);
webpage=name;
webpage+=dat;
sendwebdata(webpage);
delay(1000);
webpage = "<a href=\"https://geeksvalley.com/tutorials/";
webpage+="\">Click Here for tutorials</a>";
sendwebdata(webpage);
client.println("AT+CIPCLOSE=0");

}
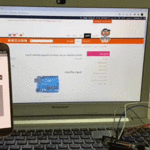
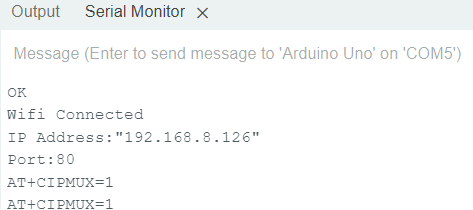
بعد رفع الكود البرمجي افتح شاشة الاتصال التسلسي وانسخ IP address عنوان الشبكة.
وضعه في المتصفح الذي تفضله، ستظهر صفحة الويب كما في الشكل.